Frequently Asked Questions
1. How do I create an application?
First of all, you have to create an account. It is very simple, and 100% free. After
that, you can create your own apps for iPhone/iPod. Just click on App Templates
and select the one you want to use.
2. I finished my application; what is next?
Now you have to make sure that your application is ready for release. Go to App
Store Properties. Make sure that your Application icon(57x57) is identical with
the iTunes icon (1024x1024) but in a different size. Fill in the required information
and click Save. Once you click on the submit button, one of our build engineers
will test your application and make sure it works properly. If there are any broken
links, buttons that don't work or content that doesn't comply with Guidelines we
will reject it. Check your app status on the website to see when your application
gets approved/rejected.
3. Application Status
 In-Design (Unpaid)
- 0
In-Design (Unpaid)
- 0 In-Design (Paid)
- 1
In-Design (Paid)
- 1 Ready-For-Release
- 2
Ready-For-Release
- 2 In-Review - 3
 In-App Store -
4
In-App Store -
44. Do I need a Developer certificate?
Only if you want your app to have your own company name as author. To find out about
how to generate a certificate, please follow this
link
5. How long will it take for my app to be approved?
It takes on average 3-10 business days; however, the process may take longer. 3-10
days is just an estimate based on our past experience with Apple's review process.
Please note that Apple does not provide any timeframe estimate on how long the process
may take. The max we've seen was 1 month. We'll be responsible for fixing any technical
issues. On your side we expect cooperation in adding proper quality content and
following our guidelines as well as Apple's requirements.
6. If the app data is saved on the mobile device, does that mean even if there is no internet the data will still be available on the mobile device?
Yes. All data is deployed to App Store/Google Play Store/Amazon Appstore and saved
on the mobile device. Even if the device has no internet connection, the app will
still work.
7. I have an iPhone app; how can I publish it on Google Play Store as an Android app?
We specialize in creating rich content native apps for iPhone and Android, too.
We try to keep these technologies separate, i.e. if you want a single app to be
submitted to both markets then you have to duplicate your content in two separate
apps (one for App Store and one for Google Play Store) - we provide the tools to
do this efficiently. To find out about how to duplicate an app, please follow this
link
8. Where I can find the SeattleClouds tutorials? Do I need to pay for them?
You can find all our tutorials in our Help
page. We are offering our tutorials FOR FREE.
9. How do I insert a YouTube video?
- Open YouTube.
- Copy the Embed code (it is under the video)
- Go to SeattleClouds >Find yourpage.html >click on Edit
- Click on the YouTube button (left side toolbox area)
- Paste the code into the YouTube box.
- Save
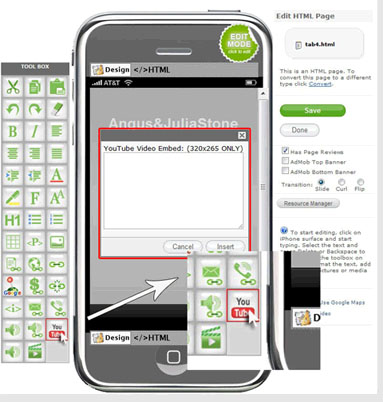
Make sure that your video's Embed code is set to 320x265 video resolutions or less, so you can see your video in portrait mode.
- Copy the Embed code (it is under the video)
- Go to SeattleClouds >Find yourpage.html >click on Edit
- Click on the YouTube button (left side toolbox area)
- Paste the code into the YouTube box.
- Save
Make sure that your video's Embed code is set to 320x265 video resolutions or less, so you can see your video in portrait mode.
10. How do I sell an app on App Store?
If you want to sell your app on App Store you will need to create Your DEV Account
with Apple under your name or your company name. To enroll in the iPhone program
go to http://developer.apple.com/programs/iphone
You will sign a contract with Apple and receive payments directly from Apple.

You will sign a contract with Apple and receive payments directly from Apple.
11. Regarding your price plans, can you tell me what happens with a monthly subscription package if I stop paying this monthly bill at a future point? What happens to the apps that have already been created and put on the App Store?
If you stop paying at a future point, the apps will still be available for download
from the App Store, Google Play or Amazon Appstore, but they will not be usable
until the bill is paid in full. Subscription-based apps will try to connect online
and check your payment status. If the apps detect that you cancelled your payment,
they will show users a popup warning message and then shut down. The message goes
away when you resume your subscription payments, and the apps will be usable again.
12. Can I use PDF files?
There are no restrictions on using PDF files. But for reading them or inserting
them into app you will need to upload your PDF file and link to it from your app
page.
13. Can I update a Live application?
You can update your app content an unlimited number of times.
14. Do I need new binaries every time I update my app on SeattleClouds?
You need new binaries if you updated a large number of files or large media files
in your app. You can only sync small files.
To find out about how to use our SYNC feature, please follow this link
To find out about how to use our SYNC feature, please follow this link
15. Does my iPhone app work on iPad?
Yes, all iPhone apps will work on iPad in magnified mode. We have templates designed
specifically for the iPad's large screen. You need to publish a separate app for
iPad only if you want to make use of the large iPad screen - 768 x 1024 pixels.
16. Can I create my app in my own editor and then add it to SeattleClouds?
Click on the Backup button in your application Dashboard. Unzip your downloaded
file and Use Dreamweaver or any other editor to edit your HTML. Keep all your files
in the root folder. Do not create subfolders.
When done, zip your folder, go to your app dashboard and hit Restore from backup to update your project with your own Zip.
When done, zip your folder, go to your app dashboard and hit Restore from backup to update your project with your own Zip.
17. How can I edit my app's name on SeattleClouds? Will the new name appear in the App Store, Google Play Store and Amazon Appstore?
Your project's name on the SeattleClouds.com website is just an identifier and not
your app name. Your app name and description will appear in the App Store, Google
Play Store and Amazon Appstore exactly as you type it in your App Dashboard -> App
Store Proprieties/Google Play Proprieties/Amazon Appstore Proprieties or in the
submission process. We will not append any promotional info.
18. How long does it take for a binary building process?
A binary build process will take 1-4 business days.
19. How do I use Ad Mob?
On the Application Settings section of your App Dashboard you'll find an Ad Mob
settings page. Paste your Ad Mob Publisher ID there. This is a string you get on
Ad Mob's website.
20. How do I get an Ad Mob Publisher ID?
Follow these steps and you'll have your Ad Mob Publisher ID in no time!
1. Go to AdMob.com and sign up.
2. Choose Add Site/App from the menu
3. Pick 'Android App'
4. Fill in the App Name, Category and App description. You don't need to enter the Android Package URL as you won't know it until you've put your app up in Google Play anyways. Leave that completely blank.
(Make sure you remove all text from the URL field if you don't use it, e.g. remove the default "market://" text.)
5. Click OK.
6. You'll then see a screen that talks about the Ad Mob Android SDK. This is the confusing part. Just ignore it and click the 'Go to Sites/Apps' button at the bottom. You don't need to download the SDK or anything. SeattleClouds takes care of that part for you already.
7. Now you'll see a list of your Apps. Find the app you just added and hover over the name with your mouse. You'll see a Manage Settings button appear. Click it.
8. That's it. You'll see your Publisher ID up at the top. It is below the App Name and below the Site URL. It is labelled 'Publisher ID' and is a 15 character code (alphanumeric).
21. How can I delete an App (project) from My Application List?
If you want to delete an Unpaid app (an that is not attached to your subscription
plan) find the X Delete button bellow your application icon in Application Dashboard.
If you want to delete a Paid app (an app that is attached to your subscription plan)
please open a Support Ticket
and we will unlock this app for you (make it unpaid).
22. Where I can find the app binary download link for my Instant Build request?
You should receive an email with a link for downloading.
Please check your spam folder. Sometimes an email can arrive and promptly be placed in your spam or junk folder.
If you are missing an email from us, please check there first and be sure to add the email address from us to your "whitelist" of approved emails.
However, if you didn't received an email with a link for downloading your app binary, you can find this download link in your App Dashboard, bellow "Ready To Publish" button.
23. How do I convert pages?
To convert pages, follow these steps:
- Open your application in SeattleClouds
- Click on Edit Pages
- Select the page you want to convert from the list of your Pages and click Edit.
- Above the Save button, you can find the Convert link. Click on it and select a new type of page to convert to.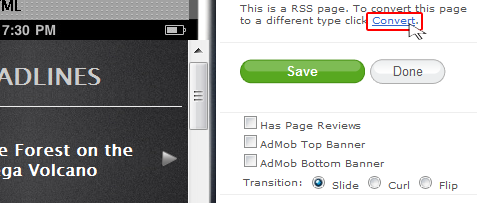
- Press the Convert button.
Important: Page type conversion will erase all information on your previous page.
24. How do I change the background image for my app?
To change the background image from your application follow these steps:
- Click on Design Properties
- In Properties list find Background Image and click on it like in the image below.

- Select a background image from the Gallery, the Search page, or Upload an image from your computer.
- Click the Add to Resources button and then click Choose. (Your new image will be automatically selected; you do not have to search through the Resources page for it.)
- Click Apply Changes to save your changes and then click Done.
If you don't want a background image, you can set just a background color.
- Click on Design Properties
- In Properties list find Background Image and click on it like in the image below.
- Select a background image from the Gallery, the Search page, or Upload an image from your computer.
- Click the Add to Resources button and then click Choose. (Your new image will be automatically selected; you do not have to search through the Resources page for it.)
- Click Apply Changes to save your changes and then click Done.
If you don't want a background image, you can set just a background color.
25. How do I change the Tabs number and Tabs Icons?
You can change your app Navigation Settings from your App Dashboard. From the Navigation
Setting section you can change the tabs number, tabs text and tabs icons.
Also, from Navigation Settings you can change your App Navigation type (No Tabs, Standard Tabs, Custom Tabs or Wheel Navigation).
Also, from Navigation Settings you can change your App Navigation type (No Tabs, Standard Tabs, Custom Tabs or Wheel Navigation).
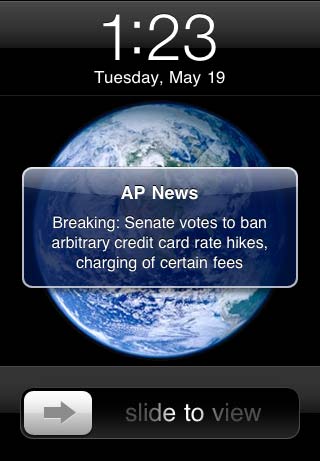
26. What is the Splash Screen used for?
Splash screen is an image that appears when the application loads. It covers the
entire screen and lasts as long as the application loads (usually few seconds).
The purpose of a splashscreen is to disguise the length of time that an application
takes to load.
27. Should my application icon and iTunes icon be the same, just one bigger and one smaller?
Yes. App icon and iTunes icon should be the same image, just different resolution.
iPhone/iPod Touch icon: 57x57 pixels
iPad icon: 72x72 px
iTunes Bigicon: 1024x1024 pixels
iPhone/iPod Touch icon: 57x57 pixels
iPad icon: 72x72 px
iTunes Bigicon: 1024x1024 pixels
28. Approval Process
Application approval is subjective to our review and Apple's review process. We
will not approve and submit apps that are incomplete, have broken links, broken
functionality, have inappropriate content, are part of a scam or infringe on copyright
laws. We will also not approve applications qualified as purely marketing ad with
limited, or no functionality.
SeattleClouds
and Apple reserves the right to reject an application based on a subjective evaluation
of the reviewer.
29. Do I need an Apple Developer account or can I submit under SeattleClouds' account?
SeattleClouds
is not submitting any more apps under our Apple Developer Account.
You need to Subscribe for your own Apple Developer Account in ordert to be able to publsih apps on Apple Store.
You need to Subscribe for your own Apple Developer Account in ordert to be able to publsih apps on Apple Store.
30. What is a Push Notification for iOS? How do Push Notifications work?
Push Notifications for iOS apps alows an application to listen for messages being
'pushed' to it from the server. Through Push Notification, your application can
communicate with your users even when the app is closed.
When can I use a Push Notification?
Any event that can generate a notification can also generate a push notification. You can have notifications sent to your app users when you want to announce an update, report news, invite to read a new post, ask for a review, any info related to your iPhone app your users will find valuable.
To enable push notifications in your app:
 This
info is for app owners that have their apps under their own dev accounts.
This
info is for app owners that have their apps under their own dev accounts.
1. Go to the Push Notifications screen.
2. Follow instructions to Create an APN Certificate and upload it.
3. If you have already created a .MOBILEPROVISION file, create a new one (just follow steps 9 through 15 from http://ismartapps.com.au/provhelp.aspx)
4. If your application is already in the App Store, click Build Binaries and replace the existing .MOBILEPROVISION with the new one. When your binaries are ready, update them on itunesconnect.apple.com
5. When your new binaries are approved, just go to the Push Notifications screen, type your push message and hit the Push button.
When can I use a Push Notification?
Any event that can generate a notification can also generate a push notification. You can have notifications sent to your app users when you want to announce an update, report news, invite to read a new post, ask for a review, any info related to your iPhone app your users will find valuable.
To enable push notifications in your app:
This
info is for app owners that have their apps under their own dev accounts.
1. Go to the Push Notifications screen.
2. Follow instructions to Create an APN Certificate and upload it.
3. If you have already created a .MOBILEPROVISION file, create a new one (just follow steps 9 through 15 from http://ismartapps.com.au/provhelp.aspx)
4. If your application is already in the App Store, click Build Binaries and replace the existing .MOBILEPROVISION with the new one. When your binaries are ready, update them on itunesconnect.apple.com
5. When your new binaries are approved, just go to the Push Notifications screen, type your push message and hit the Push button.
31. How do I set the price for an app approved by the App Store? (Credit goes to Mark Brooks for the answer. Thank you!)
Let me assume your App is online in the App Store. If this is true, login to
iTunesConnectand select Manage Your Applications.


Once in Manage Your Applications, select the application name:
Once inside the App, click on Rights and Pricing:
Once in Rights and Pricing:
1. Select the Tier you want to set for pricing.
2. In the effective date selection, set to "Now"
3. In the end date selection, set to "None"
4. Select Save Changes
If you need further instruction, you may want to check out the
iTunesConnect Developer Guide.
32. How do I upgrade my plan without repaying the setup fee? (Credit goes to Mark Brooks for the answer. Thank you!)
Follow the instructions below:


First, click on "profile" in the menu bar and then click on "Subscriptions".
Second, click on the left link to view your subscription information.
Third, select "Upgrade"
33. Tool Box Explanation

|
CUT- Select the text that you want to insert somewhere else. Click on this button in the tool box. Now choose the place where you want the text to be and click on this button again. |

|
COPY- Select the text you want to copy, and press this button in the tool box. Now choose the place where you want the text to be and click on this button again. |

|
PASTE- Use this button in the tool box to insert copied text into your application. Click this button, then choose the place where you want the text to be and click on this button again. |

|
UNDO- If you changed something in your application but don't like the result, or if you want to go back to a previous version, click this button in the tool box. |

|
REDO - If you made a change, used the Undo button, and then decided you liked the first change, click on this button in the tool box. |

|
REMOVE- If you made some changes to text (Bold, Italic, etc) and want to remove them, but not erase the text, click on this button in the tool box. |

|
BOLD- If you want your text to look thicker and darker on your application, click on this button in tool box. |

|
ITALIC- If you want your text to be tilted in the right side, click on this button in tool box. |

|
ALIGN LEFT- If you want your text to be aligned to the left side of the screen, click on this button in tool box. |

|
ALIGN CENTER - If you want your text to be aligned to the center of the screen, click on this button in tool box. |

|
ALIGN RIGHT- If you want your text to be aligned to right side of the screen, click on this button in tool box. |

|
ALIGN JUSTIFY- In justified text, the spaces between words and sometimes even between letters are stretched or compressed in order to make the text align with both the left and right margins. This style of alignment creates the illusion that your paragraph is a perfect square, but sometimes the stretched or compressed spacing can look odd. Be sure you want to deal with this offity in appearance before you decide to use this style of alignment. (The most common alignment in English is to the right side of the page.) |

|
INDENT- If you want to increase the indent level of the paragraph, click on this button in the tool box. |

|
OUTDENT- If you want to decrease the indent level of the paragraph, click on this button in the tool box. |

|
TEXT COLOR- If you want to change your text's color, you have to click on this button in tool box and pick a color you want from the palette. You can change it any time you want by pressing this button. |

|
HIGHLIGHT COLOR- If you want your text to be highlighted, click on this button in tool box and pick a color you want to use from the palette. |

|
FONT- If you want to change text's font, you can do that very easily by clicking on this button in tool box. You can pick a font from the list, ant then press Insert. |

|
SIZE- You can easily change the text's size to one bigger or smaller by clicking on this button in the tool box. Pick a size and press Insert. |
|
|
FORMAT CURENT BLOCK- The HTML h1 element contains a first level heading. Headings, serving as titles for pieces of text, help organize the information in the document to achieve a better understanding of the content. They must be a short and concise description of the content treated under them, and the font is usually larger and bolder than regular text below the Heading. |
 
|
INSERT LIST/INSERT NUMBERS - In the Tool box, select one of the following:
• Click the Bullets button here if you want to use bullets in your list.
• Click the Numbering button here if you want to use numbers in your list.
|

|
INSERT TABLE- If you want to insert a table, click on this button in tool
box and set the number of columns and rows you want. Select 1 if you want your table
to have a border or 0 to create your table without a border. WHen you have finished
choosing these parameters, click Insert.
|

|
INSERT PARAGRAPH- If you want to insert a paragraph (at least three sentences
in one block of text), simply click on this button in tool box.
|

|
INSERT IMAGE- There are several ways to choose and insert an image into your
page:
• To insert an image in your page, click on this button in tool box and select an image from Resources. • If you want to search for an image in Google, do so in the same resource manager window by clicking on the Search section. Just write your searchable word in the field and press the Search button. Select one of the images by clicking Add to Resources and then click the Choose button. • Click on the Gallery section if you want to visualize images from resources manager. Pick one, press on the green Add to Resources button and then click the Choose button. • Select the Upload section to upload a file from your computer. Click on Choose File and select a file from your computer. Then Click Upload and wait till it is uploaded in Resources Manager. Then click Choose. • If you have to upload a lot of pictures, you can download the zip file from resources manager, unzip it in your computer, add all the image files you want to use for your application, zip the file again and then upload the zip file back to your resources manager by selecting the last section: Upload Zip. Click Choose file to select the zip file from your computer and then click Upload. Now, in the first section, called Resources, you can find all the image files you wanted to use. |

|
INTERNAL LINK- You can make your readers very happy by offering them page
jumps as an alternative mode of navigating around your application. Click on this
button in the tool box, write the link text in the field and then select the page
to which you want to be linked. Then click Insert.
|

|
EXTERNAL LINK- If you want to add some external links, go to the site and
copy the link you want to insert, click on this button in tool box, and in the first
field write some link text and in the second field paste the link. Then click Insert.
|

|
LINK SELECTION- If you want some text to link to pages or sites then follow
these steps:
Select the text you want to make into a link, click on this button in the tool box and select one of three options. • The first option is for creating a link to one of your application's pages. Select the link and click Insert. • The second option is for creating a link to a web page. The web page will open in your application. Select the second option and paste the address of the web page you want to be linked. Then click Insert. • The third option is for creating a link to a web page, but it will be loaded in your browser rather than your application. Select the third option and paste the address of the web page you want to be linked. Then click Insert. |

|
INSERT GOOGLE MAP LINK- If you want to insert a Google Maps link, you have
to open Google Maps first and search for the place you want to insert in your app.
Now go to upper right corner of the page and find Link tab. Click on it and copy
the code for HTML pages. Go to the Insert Google Map button in the tool box and
click on it. Now in the first field paste the code from Google Maps; in the second
field write the main address of the place and click Insert.
|

|
IN APP PURCHASE LINK- If you want to insert an in-application-purchase links,
click on this button in tool box. In the first field write some catchy text and
in the second field insert the product ID from AppPurchase and set the page of redirection
after purchasing. Then click the Insert button.
|

|
UNLINK SELECTION- If you put a link selection in your app, but don't like
it and want to remove it, simply click on this button in the tool box.
|

|
INSERT iFRAME- If you want to insert an iFrame in your app's page, then click
on this button in the tool box and insert the source in the first field. Set the
Width and the Height and click Insert.
Remember: width doesn't have to be more than 310. |

|
INSERT MAIL TO LINK- If you want to add a mail address to your application,
click on this button in the tool box. In the first field write some text, for example
"My Email", and in the second field write your email address and then click Insert.
|

|
INSERT PHONE NUMBER LINK- If you want to add a telephone number to your application,
click on this button in the tool box. In the first field write some text, for example
"My telephone number", and in the second field write your telephone number and then
click Insert.
|

|
INSERT MP3 FILE- If you want to insert an MP3 file, you have to click on
this button in the tool box and go to the section Upload File. Click on Choose File
and select an MP3 from your computer. Then check the box Convert media file to HTTP
Live Streaming. This option is created especially for files like mp3, mp4 or .mov.
This will keep the file on the server and stream it to iPhones using Apple's Http
Live Streaming protocol. Now click Upload. Wait until your file is uploaded properly,
and go to the Resources section, select the file, and click Choose.
Important: Be sure you paid for your application before being able to upload an MP3 file. |

|
INSERT MP3 LINK- If you want to insert an MP3 link, go to a site from where
you want to insert the link and copy the embedded code. Then you have to click on
this button in your tool box and paste code into the field, and then press Insert.
|

|
INSERT YOUTUBE LINK- To insert a youtube link, follow these steps:
1. Open YouTube. Copy the embedded code; it is under the video. 2. To add code to your app, paste the code into the YouTube box. 3. Make sure that your video's embedded code is set for 320X265 video resolution or less so that you can see your videos without any problems. |
|
|
INSERT WAV FILE- If you want to insert a .wav file, click on this button in the toolbox, select Upload file, click on the Choose File button, search for file on your computer and then click Upload. When your file is uploaded go to Resources, select the file and click Choose. |

|
PLAY MOVIE- If you want to insert a .mov file you have to click on this button
in the tool box and go to the section Upload File. Click on Choose File and select
a .mov from your computer, then check the box Convert media file to HTTP Live Streaming.
This option is created especially for files like mp3, mp4 or .mov. This will keep
the file on the server and stream it to iPhones using Apple's Http Live Streaming
protocol. Now click Upload. Wait until your file is uploaded properly, and go to
the Resources section, select the file, and click Choose.
Important: Be sure you paid for your application before being able to upload a .mov file. |
34. Report Violations
If you suspect someone is a scammer, if somebody is spamming you with unsolicited messages or chat requests, if you encounter any inappropriate content such as harassment messages or nude images, please report these violations immediately. To report a violation, navigate in the menu to Help/Report Violations or click here, fill in the report violation form and click Submit. You can also use the Report Violation shortcut at the bottom of any page on SeattleClouds website and Facebook app. We appreciate your cooperation and thank you for helping us maintain clean web content.

For customer support please Schedule a Call Back


